
A pipeline inspection is a documented, risk-based sequence: define the rules, gather the data, run the right inspection tools, dig and verify, assess what you found, and fix and record it. In the oil and gas world that sequence protects steel in the ground. In a revenue team, the same sequence protects the forecast. This guide walks through the physical process first, with a checklist, and then shows how to run the equivalent inspection on a B2B sales pipeline.
We build sales execution software, so we are not the people to hire for an in-line inspection. But we spend our days on the second meaning of the phrase, and the two disciplines share more than you would expect.
TL;DR
- Physical pipeline inspection follows six stages: regulatory basis, data integration, tool selection, field verification, engineering assessment and documented remediation.
- No single method catches everything. Metal loss, cracks and third-party damage need different tools, so operators combine them.
- In the US, documentation carries nearly as much weight as the inspection. Missing records are what turn up in enforcement actions.
- A sales pipeline deserves the same treatment: clear criteria, clean data, a regular inspection cadence, verification of anything suspicious and a written record of every decision.
- The weakest link in both is the human review after the data arrives.
Table of Contents
- What a pipeline inspection is, and what it is for
- The pipeline inspection process, step by step
- How often pipelines are inspected
- A pipeline inspection checklist
- Where inspections fail
- The same process, applied to a sales pipeline
- Our perspective: inspection is a habit, not a project
- Putting automation behind your inspection routine
- FAQ
- Sources
What a pipeline inspection is, and what it is for
Pipeline inspection is the process of assessing whether a line still has the strength to operate safely. The US safety regulator PHMSA describes integrity assessment as measurements operators take to determine whether hazardous liquid or natural gas pipelines have adequate strength to prevent leaks or ruptures under normal operation.
The goal is not to find every flaw. It is to find the flaws that matter, rank them by risk, and prove that you acted on them. That framing explains most of what follows.
The pipeline inspection process, step by step
The sequence below follows the structure described in Rigzone’s overview of the inspection process, adapted to US practice.
1. Define the regulatory and technical basis
Before any tool enters the line, confirm which rules apply and what “acceptable” means. That includes the applicable codes, allowable test pressures, defect assessment methods, acceptance criteria and data quality requirements. In the US, hazardous liquid lines fall under 49 CFR Part 195 and natural gas lines under Part 192, both of which require integrity management programs.
2. Integrate historical and operational data
Pull together construction records, previous inspection results, corrosion history, operating pressures, leak history and the location of high consequence areas (HCAs). The inspection plan should come out of this data, not out of habit. A line with a history of external corrosion needs a different plan than one with a history of excavation damage.
3. Select the inspection method
The three main assessment routes are in-line inspection (ILI, often called smart pigging), direct assessment and hydrostatic pressure testing. Choosing among them depends on the threats you are managing, whether the line can physically accommodate tools and what the regulation permits.
Magnetic flux leakage (MFL) is the workhorse for metal loss in steel pipe. The tool induces a magnetic field in the pipe wall, and where the wall is thinner from corrosion or pitting, flux leaks out and sensors record it. High-resolution MFL tools, with more sensors and higher sampling rates, pick up smaller defects that older low-resolution tools can miss.
4. Prepare the line
This step is where many runs go wrong. Internal inspection needs a clean pipe, usually achieved with progressive runs of foam or brush pigs, so that debris, scale or wax does not obscure sensor data. Rigzone notes that operators often underestimate this, which leads to poor signal quality and costly re-runs.
5. Run the inspection and examine the field
The tool runs, the data is collected, and the analysts flag anomalies. Flagged locations are then excavated and examined directly, which confirms whether the tool’s call was right. This verification loop is also how you learn how much to trust the tool on your particular line.
6. Assess fitness for service
Engineers evaluate each confirmed defect against the acceptance criteria set in step 1. Some anomalies are repaired immediately. Others are classified for monitoring with a defined re-inspection date.
7. Remediate and document
Repairs are completed, the line is returned to service, and the full chain of evidence goes into the record: what was found, how it was classified, why, and what was done. The next inspection interval is set from the results.
How often pipelines are inspected
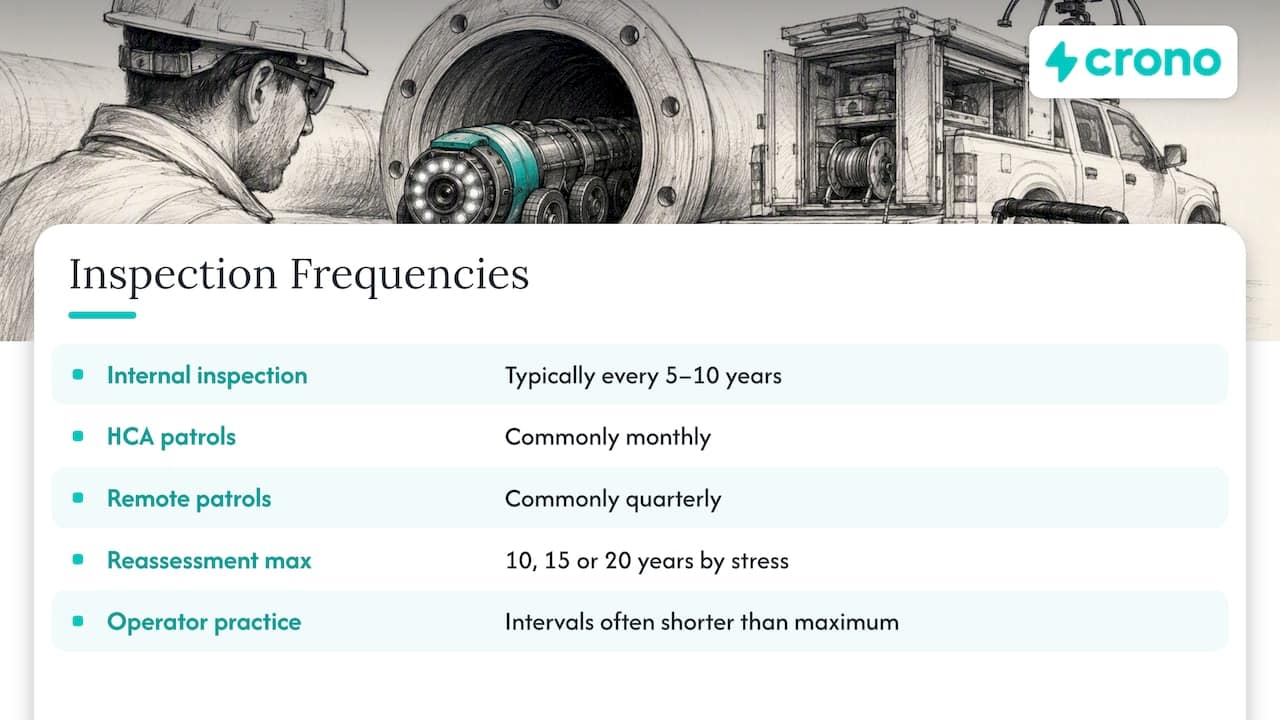
There is no single number. Rigzone describes comprehensive internal inspections as typically performed every 5 to 10 years depending on the threat profile and regulatory requirements, with right-of-way patrols commonly monthly in high consequence areas and quarterly in remote or low-consequence areas.
For gas transmission lines, PHMSA’s integrity management fact sheet sets maximum reassessment intervals for in-line inspection, pressure testing or direct assessment of 10, 15 or 20 years, depending on the stress level at which the line operates. Check the current text of 49 CFR Part 192, Subpart O, and your own integrity management plan before setting a schedule. Operators frequently choose intervals shorter than the maximum.
A pipeline inspection checklist
Use this as a working outline, then adapt it to your line, your product and your regulator.
Before the inspection
- Confirm applicable regulations and company procedures, and record the acceptance criteria.
- Review prior inspection reports, repair history and known threats.
- Verify HCA and class location data is current.
- Confirm the line can accept the chosen tool (launchers, receivers, bends, valves, diameter changes).
- Plan and document cleaning runs, and check that the cleaning results are acceptable.
During the inspection
- Confirm tool calibration and sensor function before launch and after receipt.
- Track tool location and speed against the expected run profile.
- Verify that the data set is complete, with no gaps from sensor failure or excess speed.
- Patrol the right of way for third-party activity, exposed pipe, erosion and encroachment.
After the inspection
- Analyze data and classify anomalies against the criteria.
- Prioritize digs, and compare dig findings with tool predictions.
- Run fitness-for-service assessments on confirmed defects.
- Complete repairs and record them.
- Write down the justification for every anomaly left in service.
- Set the next assessment date.
Other published templates exist for field checklists, such as MapTrack’s pipeline inspection template, which focuses on external condition and operational readiness. Treat any generic form as a starting point, not a compliance program.
Where inspections fail
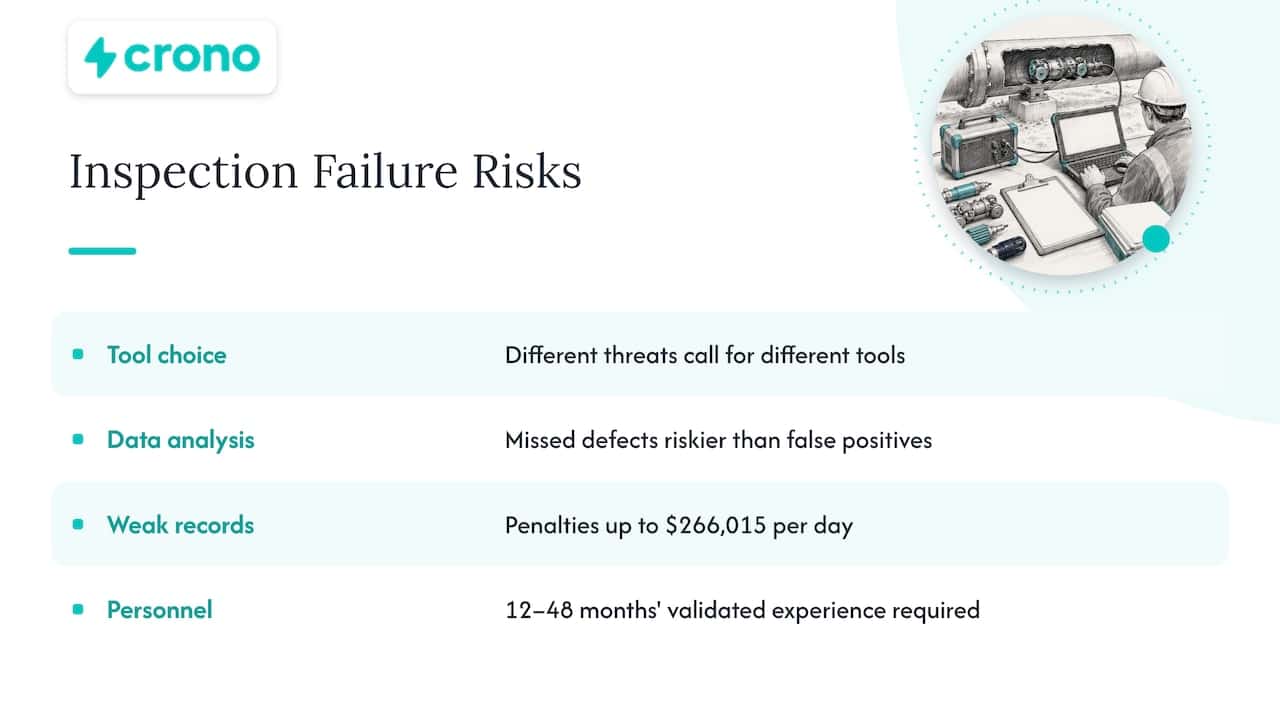
Relying on one method. PHMSA technical material makes the point that ILI tools are highly effective at detecting metal loss but less effective for cracks or geohazards. Time-dependent threats such as corrosion and time-independent threats such as third-party damage call for different tools, so operators combine MFL with caliper tools and pressure testing where appropriate.
Skimping on analysis. NiGen’s pipeline inspection checklist argues that the human review of inspection data is the largest risk: false positives are common, but missed defects from a rushed analysis are the bigger danger. Regulators tend to focus on whether the operator can justify why an anomaly was judged suitable for monitoring rather than immediate repair.
Weak records. The financial exposure is real. In a 2026 notice of probable violation against ExxonMobil Pipeline Company_text.pdf), PHMSA cited civil penalty levels of up to $266,015 per day for violations occurring between December 2023 and December 2024. Documentation of HCA validations and assessment intervals is a recurring enforcement theme.
Uncertified personnel. Qualification is a bottleneck. ASNT’s Level III certification requires validated experience of 12 to 48 months depending on education, and candidates need both technical NDT method certifications and management capability. Companies that “certify” internal staff without a maintained written practice that maps to recognized standards such as SNT-TC-1A can be penalized for the missing proof of training hours, exams and experience, not only for technical failures.
The same process, applied to a sales pipeline
Many revenue leaders search this phrase too, and the logic transfers cleanly. A sales pipeline is also an asset with hidden defects: stalled deals, missing contacts, inflated stages and close dates that nobody believes. Here is the six-stage process translated.
| Physical pipeline stage | Sales pipeline equivalent |
|---|---|
| Regulatory and technical basis | Stage definitions, exit criteria and qualification rules |
| Data integration | CRM, enrichment, email, call and signal data in one view |
| Tool selection | Which inspections you run: aging, coverage, conversion, data quality |
| Field verification | Rep or manager checks on suspicious deals |
| Fitness-for-service assessment | Keep, re-qualify, downgrade or close the deal |
| Documented remediation | Notes, stage changes and a forecast that matches |
Set the criteria first
If a stage means different things to different reps, no inspection can work. Write exit criteria for each stage in plain terms: who must be engaged, what must be confirmed, what evidence sits in the record. Our guide to weekly pipeline hygiene shows a short audit of four fields that catches most forecast distortion.
Clean the line before you run the tool
Just as debris ruins a smart pig run, duplicate accounts, missing owners and stale contacts ruin pipeline reports. Fix the data before the review, not during it. The five-step CRM data hygiene playbook covers cleanup and a three-step deduplication routine.
Use more than one inspection method
No single metric is a silver bullet in sales either. Combine:
- Aging: how long each deal has sat in its stage compared with your typical cycle.
- Coverage: whether the open pipeline is large enough for the target. We argue for a formula over the blunt 3x rule in this pipeline coverage piece.
- Activity and signals: whether buyers are engaging, and whether new buying signals have appeared.
- Data completeness: whether contacts, amounts and dates are populated and believable.
Verify before you reclassify
An automated flag is a prompt for a conversation, not a verdict. A manager should check the flagged deals with the rep and, where needed, the buyer. Over-trusting an automated report is the sales version of skipping the dig.
Write down the decision
Regulators ask operators to justify why an anomaly stayed in service. Your CFO and board ask the same of a deal that stayed in commit. A one-line reason per decision makes forecast reviews faster and improves accuracy over time. For a structured approach, see our six-step forecast accuracy fix and 90-day pilot.
A weekly sales pipeline inspection checklist
- Every open deal has an owner, a next step and a dated next action.
- No deal has exceeded its stage’s normal duration without a note explaining why.
- Close dates in the past are updated or the deal is closed.
- Each commit deal has the economic buyer identified.
- New signals (job changes, funding, hiring, intent) are matched to open and dormant accounts.
- Coverage against target is recalculated, not assumed.
- Every stage change this week has a reason in the record.
Our perspective: inspection is a habit, not a project
The most common failure we see in revenue teams mirrors what the pipeline safety material describes. Teams run a big cleanup before a quarter-end review, then let the data drift for ten weeks. A good inspection program is boring and regular.
We built Crono as a sales execution layer that connects your CRM and the rest of your stack, so that inspection data is not scattered across five tools. Our view is that the three parts of the process that humans do worst, which are gathering the data, applying the criteria consistently and recording decisions, are the parts most worth automating. The judgment call, deciding whether a deal is real, should stay with your people.
That is why we pair signal-driven prioritization and workflow automation with human review rather than replacing it. An agent can flag a stalled deal, enrich the missing contact and draft the follow-up. A manager decides what to do with it.
— Alex
Putting automation behind your inspection routine
If your weekly review is mostly spent assembling data, there is room to automate. Crono’s Pro plan starts from €79 per month per seat and the Ultra plan from €119 per month per seat, with Enterprise available on request; see the pricing page for what each tier includes. If you want AI agents to handle enrichment and outreach tasks on a credit basis, the Agentic Sales Engine is offered at €99 per month for 10,000 credits, €199 per month for 30,000 credits and €499 per month for 100,000 credits.
FAQ
What is the first step in a pipeline inspection?
Confirm the regulatory and technical basis: which codes apply, what the acceptance criteria are and what data quality you need. Only then should you review historical data and select tools. Skipping this step is how operators end up with results they cannot defend.
What does an MFL tool do in pipeline inspection?
A magnetic flux leakage tool magnetizes the pipe wall and records where the magnetic field leaks out, which happens where the wall is thinner from corrosion or pitting. It is the standard approach for metal loss in steel lines. It is less suited to crack detection, so operators pair it with other methods.
How often should a pipeline be inspected?
It depends on the threat profile, operating stress and regulation. Comprehensive internal inspections are commonly cited at 5 to 10 year intervals, while PHMSA’s gas transmission rules set maximum reassessment intervals of 10, 15 or 20 years by stress level. Right-of-way patrols are far more frequent.
How do I inspect a sales pipeline?
Define stage exit criteria, clean your CRM data, then review aging, coverage, buyer activity and data completeness every week. Verify flagged deals with the owner, and record the reason for every stage change or closure. Consistency matters more than sophistication.
Sources
- PHMSA: Overview of integrity assessment methods, MFL tools
- PHMSA: Integrity Assessment fact sheet
- PHMSA: Gas transmission integrity management fact sheet
- PHMSA: Notice of probable violation, ExxonMobil Pipeline Company_text.pdf)
- Rigzone: What is the process of pipeline inspection for structural integrity?
- NiGen: Pipeline Inspection Checklist for Oil & Gas Operators
- ASNT: NDT Level III certification
- ASNT Pulse: NDT Ethics, rewriting your written practice
- MapTrack: Free pipeline inspection checklist
